
Unfortunately, I could not find a recipe for banankager. Even when searching the web for Danish keywords (like “opskrift”, “banankage med marcipan”), I did not find the recipe I was looking for (although I found many other recipes for banana cake). This is why I tried to create a recipe for banana cakes on my own, based on the recipes for kartoffelkager and kajkager.


During my last holidays in Denmark, I took some pictures of different banana cakes to capture what they look like from the outside and inside. As you can notice, all cakes look somewhat different (see pictures above). So, it seems like there is not THE one recipe for banankage. As I especially liked the banankage on the leftmost picture (with a layer of red jam), I tried to recreate this cake.
Please note: Amounts like "5/6 cup" might be a bit unusual, but are the most accurate conversions of the amounts given in the recipe. On the page "Conversion table" you find information on how you can measure this amount using cups, tablespoons and teaspoons.
Recipe for banankager (Danish banana cakes)
Ingredients (for 12 cakes)
Cake:- 3 eggs
- 188 g (ca. 5/6 cup) granulated white sugar
- 133 g (ca. 5/6 cup) flour
- 76 g (ca. 2/5 cup) potato flour
- 1 tsp. baking powder
Filling:
- 250 g (ca. 2 cups) sifted powdered sugar
- 150 g (2/3 cup) soft butter
- 100 g (5 to 6 tbsp.) banana jam
(for self-made jam: 200 g banana, 2 tbsp. lemon juice, 100 g jam sugar (2:1))
- ca. 6 tsp. milk
Marzipan cake cover:
- 370 g (ca. 13 oz) marzipan / almond modeling paste
- ca. 50 g (ca. 2/5 cup) powdered sugar
- yellow food coloring
In addition:
- ca. 60 g (ca. 12 tsp.) strawberry jam
- ca. 60 g (ca. 12 tsp.) banana jam
- some melted chocolate (about 150 g, 5 1/2 oz)
Directions
Cake- Cream eggs and sugar together with the mixer for about 5 minutes until it’s a fluffy mixture.
- Mix flour, potato flour and baking powder and add it to the egg-sugar-mixture. Mix thoroughly.
- Spread the dough on a backing sheet covered with parchment paper.
- Bake in the oven: at 200°C (400°F), for 7 to 8 minutes.
- Sprinkle some granulated sugar on another piece of parchment paper. When you take the cake out of the oven, directly turn it upside down on the parchment paper (I was afraid, the cake might break, but everything went fine). Carefully peel off the old parchment paper.
Filling
- For the banana flavor, I added banana jam to the buttercream. As I could not find banana jam in the store, I made banana jam myself. I took 200 g banana, 2 tbsp. lemon juice, and 100 g jam sugar (2:1). I mixed the ingredients in a pot and boiled the mixture for about 3 minutes. If you can’t find jam sugar in your store, you might have a look at this recipe for banana jam.
- For making the buttercream, it’s best if all ingredients are room temperature. First, mix the soft butter with a mixer in a mixing bowl.
- Add 100 g (5 to 6 tbsp.) of banana jam and mix again.
- Add sifted powdered sugar and some teaspoons of milk and keep on mixing. The mixture should be creamy, but still stiff.
Putting the cakes together
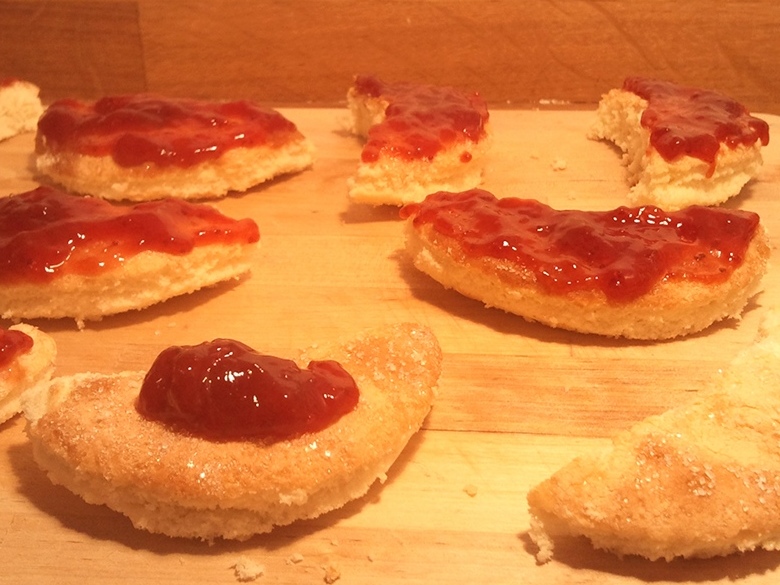
- Cut out 12 small round cake layers using a glass or a cookie cutter. I used a glass with a diameter of 8 cm (ca. 3 1/4 inches).
- To make the cakes banana shaped: First, cut each cake layer in half, so that you have 24 semicircles. Afterwards, cut each semicircle into a half moon.

- Spread some strawberry jam (about 1 tsp. per cake) over 12 cake layers.
- Put the buttercream into a piping bag and pipe about 1/3 of the buttercream onto the 12 cakes. Put the other 12 cake layers on top.
- Spread some banana jam (about 1 tsp. per cake) over the cakes.
- Pipe the remaining buttercream onto the top of the cakes. Afterwards, put the cakes in the freezer for about 1 hour.


- Now you can roll out the marzipan. I did it the following way: take about 40 g (1.5 oz) marzipan and roll it to an oval shape. Next, place it on a sheet of plastic wrap, and cover it with another sheet of plastic wrap. Use a rolling pin to roll the marzipan into a flat oval (18 x 14 cm / ca. 7 x 5.5 inches).


- Remove the top layer of plastic wrap. Take the bottom layer with the marzipan cover and place it over the cake. Gently remove the remaining plastic wrap. Fold the marzipan around the cake. Cut off the excess marzipan with a knife and use it (in my case it was about 5 g, 1/6 oz) for the next marzipan cover. When the cake is covered, place it back in the freezer for some minutes.
- Melt the chocolate and pour the melted chocolate in a small bowl. Dip the bottom of each cake in the chocolate, and let the excess chocolate drip off (you might give it a gentle shake). Afterwards, place the cake on a parchment paper so that the chocolate can dry.
- Take a pastry brush and dip it in the liquid chocolate. Paint some brown stripes on the bananas.


Now the cakes are ready-to-eat! As they can be stored in the freezer for a few days, you can bake them ahead of time.
Velbekomme!
Download PDF version
 |
| Final Danish marzipan banana |
 |
| Cross-section of a Danish banana cake |
No comments:
Post a Comment