Kajkager do not only look cute, but are also very delicious. They are popular among kids and adults alike, and seem to be widely spread in Denmark. You can find them in almost any Danish bakery.
I used a Danish recipe from the blog kappeldk.blogspot.dk. Different from the recipe, I added some strawberry jam to the buttercream. For the cake, I used the same recipe as for the kartoffelkager. But you could also buy a cake (10 inches in diameter).
The name "kajkager" is inspired by a character from the Danish children's television series "Kaj and Andrea". Kaj and Andrea are both hand puppets. Kaj is a frog and Andrea is a parrot. Hence, "Kaj" is the name of a frog and not the Danish word for "frog".
Recipe for kajkager (Danish frog cakes)
Ingredients (for 7 cakes)
Cake:
- 2 eggs
- 125 g (ca. 1/2 cup + 1 tbsp.) granulated white sugar
- 89 g (ca. 1/2 cup + 1 tbsp.) flour
- 51 g (ca. 1/4 cup + 2 tsp.) potato flour
- 2/3 tsp. baking powder
Filling:
- 200 g (ca. 1 1/2 cups + 2 tbsp. + 2 tsp.) sifted powdered sugar
- 100 g (ca. 1/4 cups + 3 tbsp.) soft butter
- 50 g (ca. 3 tbsp.) strawberry jam
- ca. 4 tsp. milk
- ca. 4 drops vanilla (optional)
- red food coloring (optional)
Marzipan cake cover:
- 220 g (ca. 8 oz) marzipan / almond modeling paste
- ca. 25 g (ca. 1/4 cup) powdered sugar
- green food coloring
For the frog’s face:
- 30 g (ca. 1 oz) marzipan + some powdered sugar + red food coloring (for the frog’s tongue)
- 30 g (1/4 cup) powdered sugar + 2 tsp. water or lemon juice (for the frog’s eyes)
In addition:
- ca. 70 g (ca. 4 tbsp.) strawberry jam
- some melted dark chocolate (about 100 g, 3 1/2 oz)
Directions
Cake
- Cream eggs and sugar together with the mixer for about 5 minutes until it’s a fluffy mixture.
- Mix flour, potato flour and baking powder and add it to the egg-sugar-mixture. Mix thoroughly.
- Spread the dough on a round baking pan (26 cm / 10 in. in diameter) covered with parchment paper.
- Bake in the oven: at 200°C (400°F), for 7 to 8 minutes.
- Sprinkle some granulated sugar on another piece of parchment paper. When you take the cake out of the oven, directly turn it upside down on the parchment paper. Carefully peel off the old parchment paper.
Filling
- For making the buttercream, it’s best if all ingredients are room temperature. First, mix the soft butter with a mixer in a mixing bowl.
- Add 50 g (ca. 3 tbsp.) of strawberry jam and mix again.
- Add sifted powdered sugar and some teaspoons of milk. Keep on mixing until the mixture gets creamy.
- The mixture should already be somewhat reddish in color. To intensify the red color, add some drops of red food coloring. If you like the taste of vanilla, add some drops of vanilla flavor. Mix again. The mixture should be creamy, but still stiff.
Putting the cakes together
- Cut out 7 small round cake layers using a glass or a cookie cutter. I used a glass with a diameter of 5 cm (ca. 2 inches).
- Spread strawberry jam (about 1/2 tbsp.) over each cake.
- Put the buttercream into a piping bag and pipe the cream onto the 7 cakes. Afterwards, put the cakes in the freezer for about 1 hour.
- Mix marzipan with powdered sugar (I used about 25 g / 1/4 cup powdered sugar for 220 g / 8 oz marzipan). Add some drops of green food coloring to the marzipan and knead it well until the color is evenly distributed.
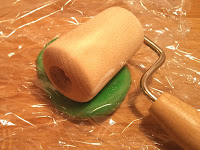
- Now you can roll out the marzipan. I did it the following way: take about 40 g (1.5 oz) marzipan and roll it to a small ball. Next, place the ball on a sheet of plastic wrap, and cover it with another sheet of plastic wrap. Use a rolling pin to roll the marzipan to a circle (15 cm / ca. 6 inches in diameter).
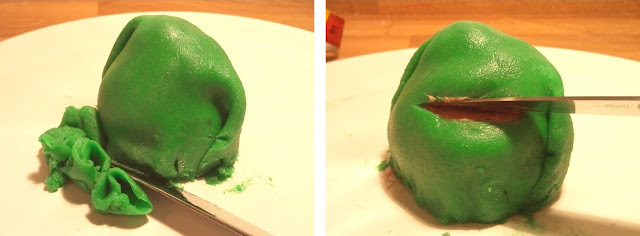
- Remove the top layer of plastic wrap. Take the bottom layer with the marzipan cover and place it over the cake. Gently remove the remaining plastic wrap. Fold the marzipan around the cake. Cut off the excess marzipan with a knife and use it (in my case it was about 5 g, 1/6 oz) for the next marzipan cover. When the cake is covered, place it back in the refrigerator or freezer for some minutes.
- Melt the chocolate and pour the melted chocolate in a small bowl. Dip the bottom of each cake in the chocolate, and let the excess chocolate drip off (you might give it a gentle shake). Afterwards, place the cake on a parchment paper so that the chocolate can dry. You’ll need some drops of liquid chocolate for the frog’s pupils.
Decorating the frog’s face
- For the frog’s mouth: cut a slit in the cake with a knife.
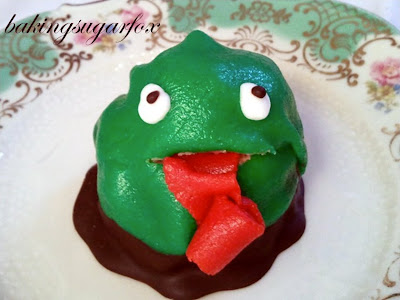
- For the frog’s tongue: mix about 30 g / 1 oz marzipan with some powdered sugar and red food coloring. Divide it into 7 portions. Model a tongue, for example by rolling out each portion and cutting out a strip. Place the tongue into the frog’s mouth.
- For the frog’s eyes: mix ca. 30 g / 1/4 cups powdered sugar with 1 to 2 teaspoons of water or lemon juice. Fill the icing in a piping bag. The icing should be stiff enough to hold its shape. Pipe two eyes on every cake. For the pupils, take a toothpick and dip it into the liquid chocolate. Place a drop of chocolate on each eyeball. Of course, you could also use other candy for the eyes, for example white candies for the eyeballs and chocolate chips for the pupils.
Happy baking and decorating!
P.S.: In my experience, the cakes still taste delicious after having been in the freezer for a few days.
Final Danish frog cake
|
Cross-section of a frog cake
|


Thank you so much for posting this recipe - these frogs (without the tongues) were very prevalent in the Minneapolis area when I was a kid. Unfortunately they are impossible to find now. I can't wait to try this recipe and recreate what I remember.
ReplyDeleteHi Tammy! Thanks for your comment. I had no idea, that these cakes were also very prevalent in Minneapolis. I thought it's an exclusively Danish treat. You never stop learning... :-)
ReplyDelete